
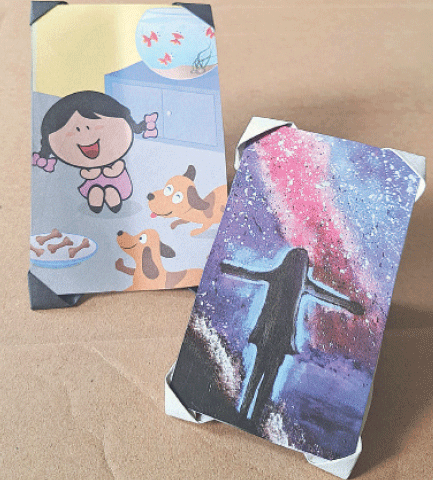
Let’s make an instant photo frame using just a piece of paper today. It’s something you can easily carry around or place on your study table. The best part is, you can make as many as you like, in any size, without using glue or any wooden support. All you need is a picture of yourself or your loved one. It may look simple, but it’s actually a clever little play of creativity with paper.
Things you need:
Ruler
Patterned or colourful paper
Scissors
Directions:
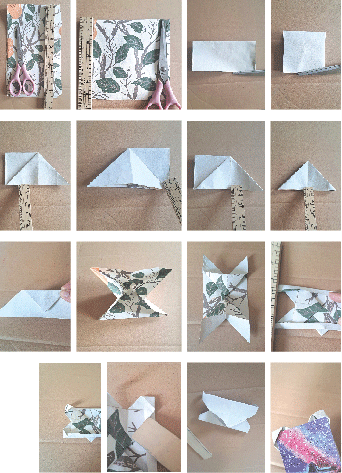
Cut a square piece of paper, six inches on all sides. The size of the paper should match the photo you plan to use. Since the finished frame will be about 3.5 inches in length, a 3-inch photo will fit perfectly; picture 2.
Fold the paper in half from any side; picture 3.
Fold it again to form a small square, picture 4.
With the folded square, open one side. You’ll notice an upside-down triangle shape; picture 5.
Make a crease along it, then fold it back to its original position.
Repeat the same step on the left side, open the fold to see the upside-down triangle, make a crease and fold it back again; pictures 5 and 6.
Now comes the slightly tricky part, which is also the main step. Open the first triangle fold you made, then turn the paper over and open the second one. Remember, the first triangle is already open and now the second one joins it. You’ll end up with one united triangle with folded layers inside; see pictures 7 and 8.
Fold the top corner downwards, but not completely, leaving about a centimetre above the edge, picture 9.
Keep the shape intact by slightly opening the middle of the folds as shown in picture 10.
Gently press the right and left folds towards their base. Remember, you’ve already folded the top corner behind the frame, so keep it that way. Press only the front layers. As you press down, you’ll notice that the two flat side edges become more defined, while the front folds form two neat triangles that meet at their tips in the centre, with their straight edges pointing in opposite directions; picture 11.
Fold about half a centimetre inward from both the right and left sides of the structure; picture 12.
Fold the top and bottom corners inward by about one centimetre from their edges. You’ll notice small pockets forming in each corner — these will hold your photo securely in place. Press them firmly so they stay neat and strong, as shown in pictures 13 and 14.
For the stand, simply turn the frame over, open the back fold gently and press it to form a support. That’s it! Turn it back, insert your photo and place it wherever you like.
The writer can be contacted at ithecraftman@gmail.com
Published in Dawn, Young World, October 25th, 2025


