

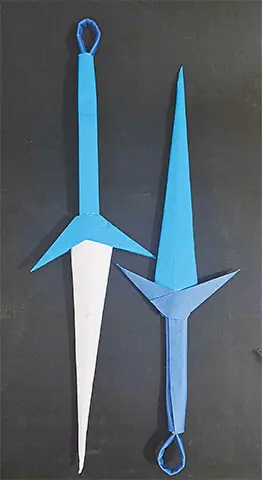
Kids love toys, whether they are made of plastic, wood or even paper. From cars and dolls to swords and action figures, there is always something fun to play with.
However, it becomes even more fun if you can make your own toy to play with.
So, why not turn some coloured paper into a cool paper sword?
Let’s start!
Things you need:
-
3 coloured papers; choose a contrasting colour with which you can make the handle of the sword.
-
Scissors
-
Hot glue (optional)
-
Double-sided tape
-
Rubber band
Directions:
-
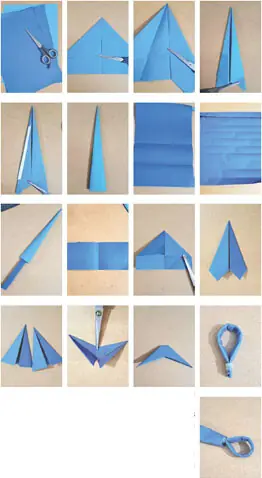
Fold the paper in half and cut it along the fold. Take one half and bring both corners towards the centre so they meet, as shown in picture
-
Fold each flap towards the centre again. Fold it once more to make it narrower. Repeat these folds on both sides, as shown in pictures 3 and 4.
-
Paste double-sided tape along the left side of the flap; see picture
-
Remove the cover from the double-sided tape and join both flaps together. Then cut off the extra triangular piece from the bottom; the sword blade is ready. Set it aside for now, as shown in picture
-
Take another sheet of paper, preferably in a contrasting colour. Fold it in half width-wise, then fold one half twice, then separate the paper sections (see picture 7).
-
To make the grip/handle: take one section of the paper and fold about 1 centimetre from one end. Keep folding it over itself until you reach the end. Insert this folded strip into the narrow triangular sword piece you made earlier. Secure it with hot glue or double-sided tape, as shown in pictures 8 and 9.
-
To make the cross guard/guard: take another equal section of paper and fold it in half to make a crease. Cut along the crease to divide it into two pieces; see picture 10.
-
Take one of these pieces and bring its corners towards the centre. Fold the flaps towards the centre again to make them narrower; cut the pointy extra part from the bottom to make it straight, as shown in pictures 11 and 12.
-
Make two such identical triangular pieces, as shown in picture 13.
-
Join these two pieces at their wider ends, keeping their pointed ends facing opposite directions; secure them with glue or tape. Cut out the pointed centre to create space for the handle, as shown in pictures 14 and 15.
-
Insert the handle guard onto the straight handle and slide it up until it reaches the sword blade.
-
To make the end loop, fold the remaining paper into a thin strip and roll it into a small coil. Cut it to the required size and insert it into the top of the handle, as shown in pictures 16 and 17.
The writer can be contacted at ithecraftman@gmail.com
Published in Dawn, Young World, September 12th, 2026